
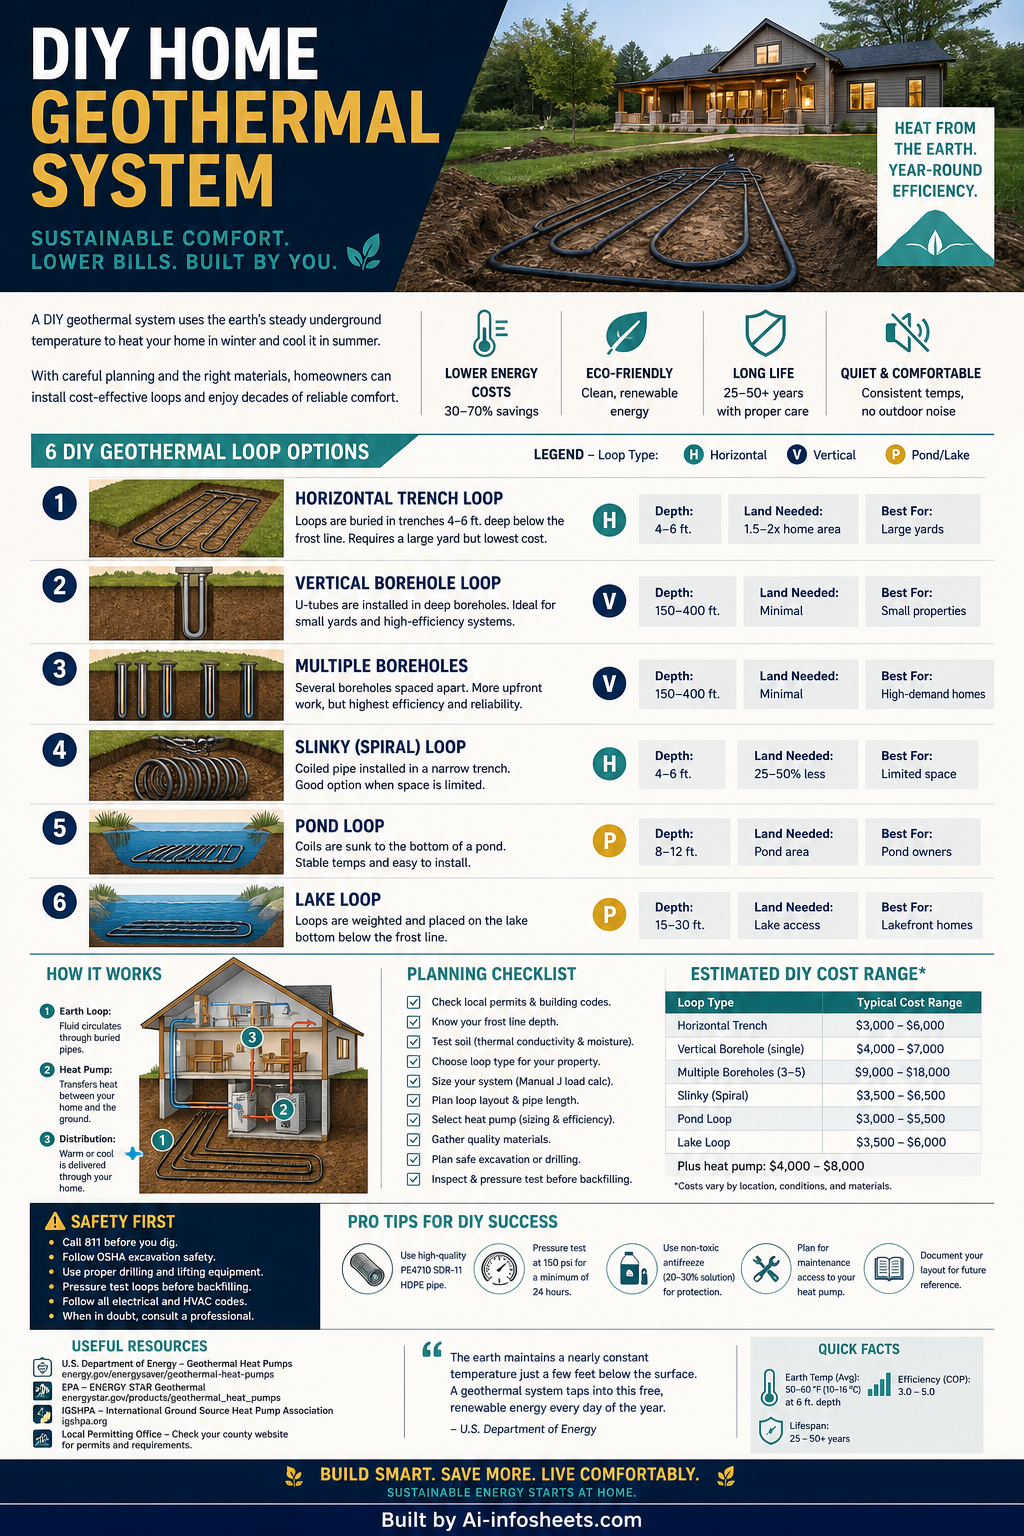
Geothermal heating and cooling systems harness the stable underground temperature to provide efficient climate control for homes. While the prospect of a do-it-yourself (DIY) installation can be appealing to many homeowners seeking energy independence and cost savings, these projects are inherently complex, requiring significant technical expertise, specialized equipment, and adherence to local regulations. Understanding the fundamental components, installation considerations, and inherent challenges is crucial before embarking on such an endeavor.
Understanding Geothermal Systems for DIY Home Installation
Geothermal systems, also known as ground-source heat pumps (GSHPs), operate by exchanging heat with the earth. During winter, the system extracts heat from the ground and transfers it indoors; in summer, it reverses the process, moving heat from the house into the cooler earth. This constant underground temperature – typically between 50°F (10°C) and 60°F (15.5°C) just a few feet below the surface – makes geothermal an incredibly efficient heating and cooling solution. Homeowners considering a DIY approach must thoroughly research system types, design principles, and local permitting requirements.
Ground Heat Exchanger (Ground Loop)
The ground loop is the most distinctive characteristic of a geothermal system and forms the heart of its outdoor component. This network of buried pipes circulates a water-based solution, exchanging heat with the earth. There are several configurations, each with specific site requirements. Horizontal loops are typically less expensive to install if adequate land is available, requiring Trenches dug 4 to 6 feet (1.2 to 1.8 meters) deep across a significant area of the property, as outlined by the U.S. Department of Energy (sourceIndex: 0). Vertical loops are more space-efficient, ideal for smaller lots, but require specialized drilling equipment to create boreholes 100 to 400 feet (30 to 120 meters) deep (sourceIndex: 0). Closed-loop systems are most common for residential use, circulating an anti-freeze solution in a sealed system. Open-loop systems, less common, use an available water source like a well or pond, but require careful consideration of water quality and discharge regulations.
Geothermal Heat Pump Unit
Often described as the brain of the system, the geothermal heat pump unit is typically located indoors. Similar in appearance to a conventional furnace or air handler, this unit contains the compressor, heat exchanger, and fan. It is responsible for transferring heat between the ground loop and the home's air distribution system. The efficiency of a geothermal heat pump is measured by its Coefficient of Performance (COP) for heating and Energy Efficiency Ratio (EER) for cooling. Modern GSHPs can have COPs of 3.0 to 5.0 (sourceIndex: 1), meaning they deliver 3 to 5 units of heat energy for every 1 unit of electrical energy consumed. This efficiency significantly contributes to energy savings, potentially reducing heating and cooling costs by 25% to 50% compared to conventional systems (sourceIndex: 2).
Air Delivery System (Ductwork)
The air delivery system distributes the conditioned air throughout the home. This typically involves existing or newly installed ductwork. Properly sized and sealed ductwork is critical for the overall efficiency of the geothermal system. Leaky or undersized ducts can significantly diminish performance and increase energy waste. In a DIY scenario, homeowners must ensure the ductwork can handle the airflow requirements of the geothermal heat pump, which may differ from traditional HVAC units. Mismatched components can lead to reduced comfort, higher energy bills, and premature system wear.
Pumping and Controls
Circulation pumps are essential for moving the heat exchange fluid through the ground loop and the indoor heat pump unit. Proper pump sizing is critical to ensure adequate flow rates without consuming excessive electricity. Control systems, including thermostats and zone controls, manage the system's operation, ensuring optimal comfort and energy efficiency. Programmable thermostats allow homeowners to set schedules, further optimizing energy use. Integrated control panels often monitor system performance, pressure, and temperature, providing diagnostic information. For a DIY installer, setting up these components requires a detailed understanding of electrical wiring and system logic.
Key Considerations for DIY Geothermal Installation
Undertaking a DIY geothermal project requires a thorough understanding of civil engineering principles, HVAC system design, and local environmental regulations. Site assessment is paramount: soil type, available land for trenching or drilling, and proximity to water sources all influence the system's viability and design. The upfront cost for ground loop installation, particularly drilling for vertical loops, can be substantial even in a DIY context due to equipment rental or contractor fees for specialized tasks. Homeowners must also consider the necessary permits, which vary by municipality but often include building, mechanical, and sometimes environmental permits. Failure to comply can result in fines or mandates to remove the system. While potential energy savings are significant, the complexity and long-term nature of a geothermal system make professional design and installation often the most reliable path. Federal tax credits, such as the 30% credit through 2032 as part of the Inflation Reduction Act, significantly offset the cost of professionally installed systems and should be factored into any cost-benefit analysis (sourceIndex: 3).
If you're considering a transition to geothermal energy, it's wise to consult with certified professionals to understand the scope, assess your property's suitability, and ensure a safe, efficient, and code-compliant installation. While DIY may save on labor, the risks associated with improper design or installation can far outweigh the potential savings, leading to costly repairs and reduced system lifespan.